All Українська articles
Resorts & Destinations
Backcountry Bonanza – Сфокусований посібник із подорожей гірськолижними курортами
Leo WinterhartPublished December 19, 2025· Updated May 10, 2026 13 min read Українська
Рекомендація: Починайте з північних схилів на світанку, обираючи найлегші кілометри, залишаючись активними, а потім переходьте до різноманітного рельєфу, коли день потеплішає.
Спорядження та стратегія утеплення: Візьміть компактний набір з високим рівнем утеплення для надзвичайних ситуацій, біпер, лопату, щуп та надійні скіни. Ставтеся до багатошаровості як до плану опалення — вологовідвідні тканини, дихаюча зовнішня оболонка та легкий середній шар. У районі снігових мас, грудневі погодні умови здебільшого стабільні на високих полицях, але ви повинні перевірити останній прогноз перед тим, як вирушати в поле; це допоможе вам збалансувати витрати енергії та комфорт, а також залишатися зосередженим. Також стежте за кількістю спорядження, щоб залишатися рухливим.
Рельєф та темп: Більшість маршрутів пропонують безліч варіантів з поєднанням сприятливого для початківців рельєфу та крутіших ділянок. Наскільки це можливо, уникайте старого снігу; під час підйому використовуйте стабільну потужність, підтримуйте розслаблений ритм і робіть короткі перерви. Оскільки ваше тіло працює найкраще, коли ви залишаєтеся гідратованим, беріть із собою воду та енергетичні жуйки, витрачайте час на оцінку свого маршруту перед тим, як зобов'язатися, а потім коригуйте відповідно до змін умов.
Уникнення ризику та інформування: Перевіряйте прогнози лавин та вітрових плит; як зазначено в офіційних брифінгах, багато ризикованих днів залежать від накопичення вітру та коливань температури. У північних долинах у грудні багато сонячного впливу, але стабільність часто надходить зранку. Простий контрольний список допомагає вашій групі залишатися узгодженою: тестування біпера, техніка роботи з лопатою та дотримання запланованого енергетичного бюджету, що відповідає вашим бажанням і потребам. Це допомагає як новачкам, так і ветеранам залишатися в безпеці. Компактний павербанк підтримує заряд пристроїв для навігації та використання біпера, а ваші пристрої, що працюють від сонячної або акумуляторної батареї, залишаються готовими після довгих переходів.
Оперативні нотатки: Рішення легше ухвалювати, коли ваш рюкзак залишається легким, а план — гнучким. Коли прогноз передбачає короткий вікно, проведіть час у секторі Согн, розвідуючи маршрути, що мінімізують ризик, залишаючись у межах ваших можливостей. Ваш комплект повинен адаптуватися: компактний утеплений шар, бівачний мішок та невелика плита для гарячої їжі після завершення. Більшість днів ви будете активними, і команда повинна залишатися в межах безпечного запасу похибки, щоб уникнути втоми під час руху та підйому.
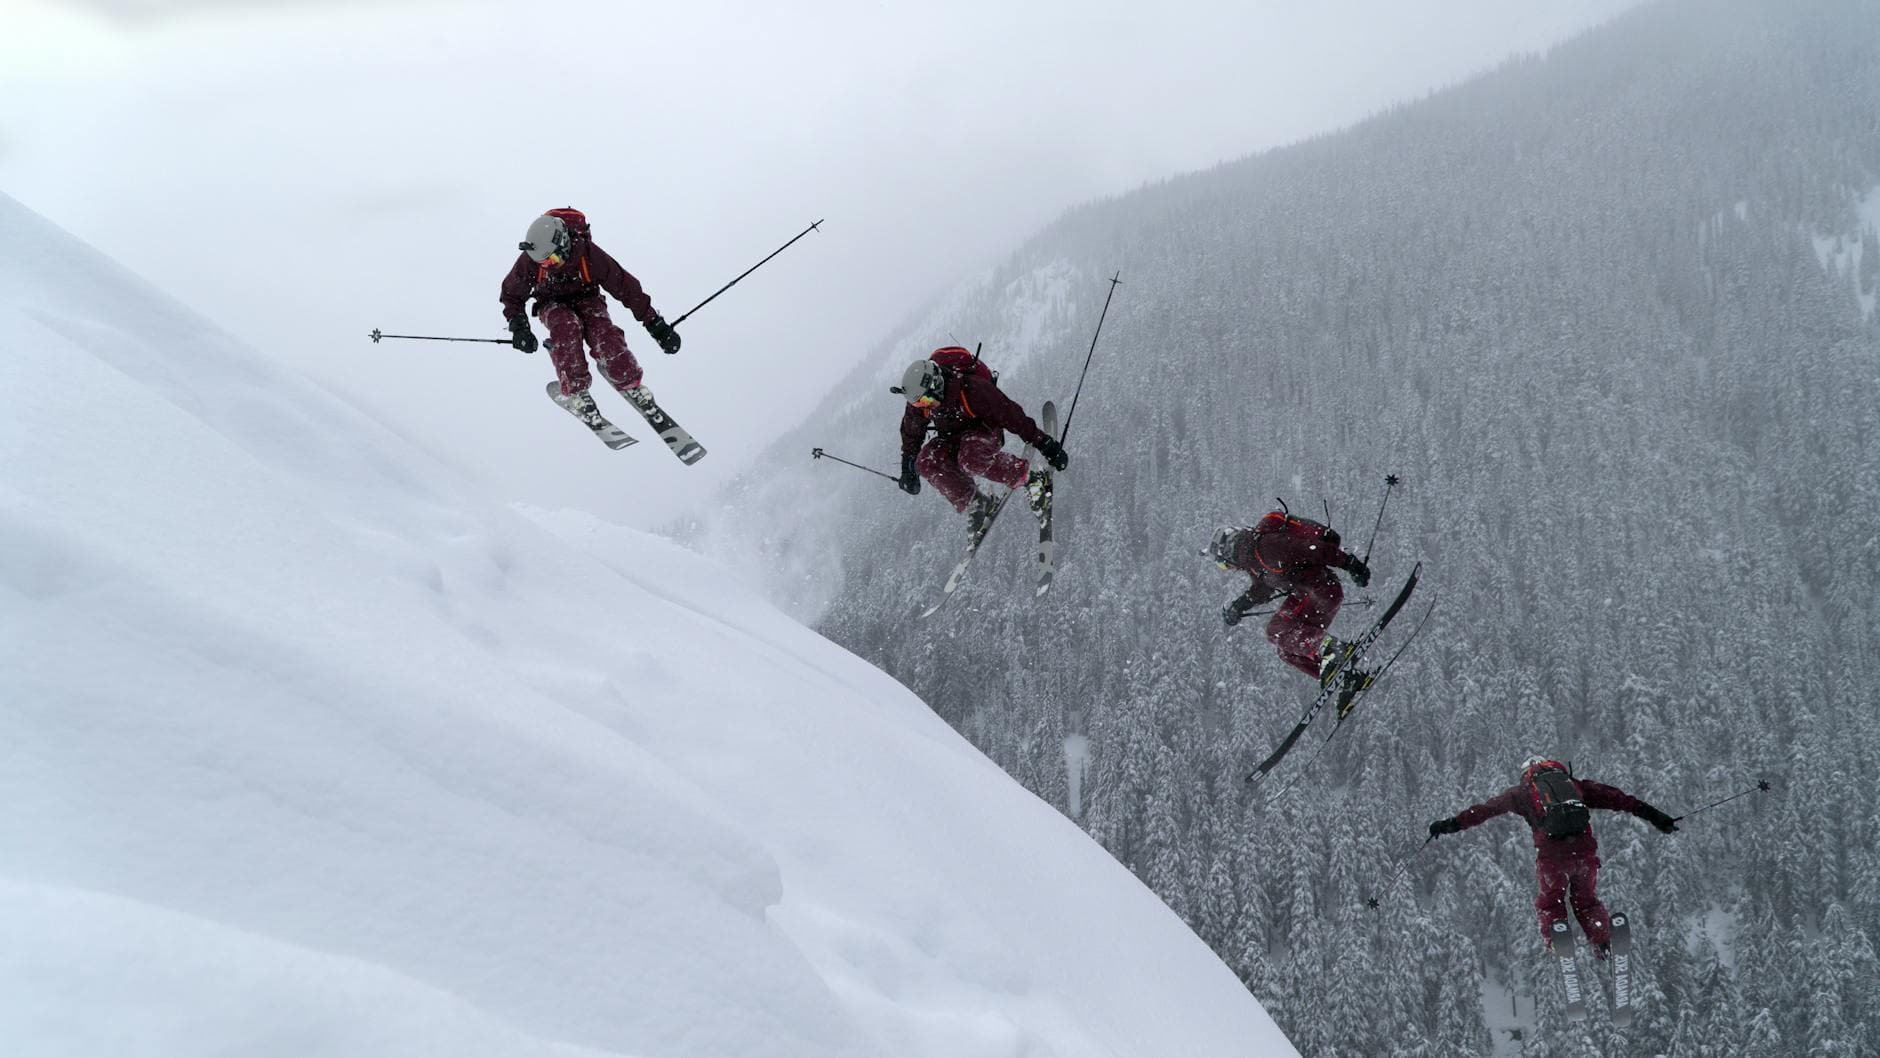
Почніть з простого правила: залишайтеся на схилах з кутом нахилу 28–30 градусів або менше, якщо дані про стабільність не підтверджують інше; це мінімізує екстремальний ризик сходження лавин протягом зимового сезону на різноманітному рельєфі Вермонту. Шукайте снігові кишені, що ховаються під кіркою, і оцінюйте, чи можуть недавнє навантаження, перерозподіл вітром або зміна погодних умов змінити ризик перед тим, як перейти до маршруту. Підтримуйте тісний зв'язок зі своєю групою та призначте особу, яка приймає рішення, що може зупинитися, якщо показники зміняться.
Кути 25–30 градусів вимагають швидких перевірок стабільності; якщо швидкий тест снігового покриву показує слабкий шар або раптове поширення тріщин, відмовтеся від цієї ділянки. Схили вище 30 градусів вимагають явних точок прийняття рішень: скоротіть час перебування, обирайте маршрути з чистими шляхами відходу або відступайте до нижчих банкеток. Якщо ви хочете продовжити, переконайтеся, що шлях відходу видимий, і що основний маршрут не буде спрямовувати уламки в пастку. Внутрішні перевірки та компактний міні-план допомагають проєкту залишатися на правильному шляху, особливо коли погода погіршується, і ви стикаєтеся з поривчастим вітром або зниженою видимістю; це часто трапляється там, де бореальні погодні патерни зустрічаються з виступаючими скелями та карнизами. Вибір часто визначається поточним сніговим покривом та впевненістю групи, але розважливий підхід полягає в тому, щоб розглядати будь-який схил вище 30 градусів як екстремальне середовище, що вимагає дисципліни та чітких тригерів. Перед тим, як рухатися, переконайтеся, що всі в групі — включно з гідами — знають, де знаходяться шляхи відходу, і що рельєф дозволяє швидкий відступ, якщо тріщина поширюється під навантаженням, тому що один невірний крок може поставити під загрозу весь спуск. Там, де спостерігачі помітили вітрові плити на гребені, внутрішній ризик зростає, а консервативний слід часто залишається найкращим варіантом для тихого, безпечного спуску.
Пастками рельєфу є яри, скельні уступи або зони винесення, які концентрують уламки; виявляйте їх здалеку, щоб уникнути переходу на маршрут, що закінчується вузьким простором з невеликим запасом. Шукайте карнизи, випуклі перекати та зміни в прогресуванні схилу, які сигналізують про прихований вихід; ці сигнали вказують, де зупинитися та переоцінити. У містах Вермонту відзначені нагородами мережі гідів надають посилання на брифінги щодо небезпек, які часто включають інформацію про те, де очікувати пасток і як коригувати маршрути. Якщо ви бачите потенційну пастку під якоюсь особливістю, розгляньте можливість зміни маршруту або переходу на безпечніший рельєф на основному хребті, а не просування до центру чаші. Коли погода нестабільна, або коли міні-шторм додає нові шари, ризик зростає; розглядайте ці моменти як час для перегрупування, повторної перевірки прогнозів погоди та, можливо, зміни напрямку. Надійний підхід включає швидку перевірку скінів і утеплювальних шарів для підтримки тепла та енергії, що допомагає групі залишатися зосередженою та запобігає затуманенню суджень втомою. У таких випадках група повинна триматися разом, залишатися спокійною та покладатися на внутрішній протокол прийняття рішень, який найкраще підходить для вашої групи, тому що добрі рішення залежать від чіткого спілкування та спільного плану, що враховує рельєф, вітер та структуру снігу.
Почніть з ями глибиною 60 см на цільовому схилі, під кутом 28–34 градусів, записуючи глибину шарів кожні 10 см і відзначаючи тип зерен, зв'язність, кірки та фасеточні кристали. Виконайте тест на зсув лопатою на глибині 20 см і знову на 60 см. Три ознаки стабільності визначають ризик: стійкий слабкий шар, кірка над щільною плитою зі слабким утепленням та лінія перелому, яка поширюється під помірним навантаженням. Якщо виявлено будь-яку ознаку, обирайте варіанти з низьким ризиком або вибирайте зелений рельєф з більш пологим нахилом, замість того, щоб вирушати на круті ділянки. В умовах снігових мас, особливо у величезних вертикальних альпійських районах, цей метод показує, як утеплення між зернами регулює передачу енергії та потужність руйнування. Те, що ви спостерігаєте в ямі, повинно трансформуватися в чітке рішення про те, чи продовжувати рухатися вздовж стежки, чи відступити до доступного рельєфу з нижчим ризиком. Загалом, цей підхід допомагає виключити зони найвищого ризику та зберегти спуск на тій самій лінії, що й нижні ділянки схилу. Включіть три виміри на профіль, щоб зміцнити капітальну документацію для майбутніх поїздок. Крім балачок у таверні, практичний висновок полягає в тому, що те, що ви бачите, корелюється з наступною дією: куди повернути назад, яким шляхом піти і як довго чекати перед повторною перевіркою.
Де розмістити яму: у верхній третині схилу, поперек лінії, щоб охопити вітрові плити та справжні шари; рекомендовані розміри: глибина 60 см, ширина 60 см, основа спирається на стабільний інтерфейс. Використовуйте металевий щуп для визначення меж та запишіть щонайменше три секції: поверхнева кірка, вітрова плита та слабкий шар. Тести: зсув лопатою до руйнування вздовж слабких інтерфейсів; тест на стиснення на одному блоці для оцінки згуртованості; додатковий розширений тест на розрив шляхом підняття блоку, щоб побачити, чи поширюється розрив. У таких регіонах, як Європа, включаючи Австрію та інші альпійські зони, той самий метод застосовується до широкого спектру алей та курортів, де снігові кишені часто розташовуються за кірками. Завжди відзначайте значення утеплення між шарами, оскільки це сильно впливає на те, як задане навантаження перетворюється на руйнування. Основна мета — кількісно оцінити ризик та отримати практичну метрику прийняття рішень для заданого маршруту, де високі ризики вимагають додаткової обережності, а нижні, зелені рельєфи пропонують доступні варіанти. Три ключові виміри — глибина шару, тип зерен та зв'язність — складають основу цієї оцінки та надходять до капітальних даних, що використовуються для майбутніх поїздок.
Індикатори шарів включають глибинний іней або фасеточні зерна біля слабкого інтерфейсу, вітрові плити, що лежать на кірці, та кірки, які легко зсуваються. Основні ознаки стабільності три: глибина слабкого шару, товщина плити та міцність зв'язку на межі над слабким шаром. Що робити, залежить від комбінації: якщо видно лише одну ознаку, залишайтеся на типових, менш відкритих маршрутах і зменшуйте вплив; якщо дві ознаки збігаються, відкладіть спуск до безпечніших зон; якщо три ознаки збігаються, відступайте до доступного рельєфу та перевірте знову після періоду консолідації. В Європі, переважно в Австрії та інших альпійських районах, вітрові патерни створюють широкий діапазон стабільних станів, тому результати з районів снігових мас — особливо з північної, багатої на сніг сторони — залишаються актуальними. У разі сумнівів покладайтеся на найнижчий ризик: тримайтеся нижчих схилів, уникайте високих ризиків і базуйте рішення на польових даних, а не на припущеннях. Практичний висновок полягає в тому, щоб записувати глибину шарів, тип зерен та результати тестів і застосовувати їх до майбутніх рішень: яким шляхом піти, куди повернути назад і скільки чекати перед повторним відвідуванням.
Почніть з дисципліни прогнозування: порівнюйте кілька погодних моделей на наступні 24–72 години, використовуючи глобальні запуски (GFS, ECMWF, ICON) та варіанти з високою роздільною здатністю (HRRR, NAM-LD), де це можливо. Якщо сигнали розходяться, дійте обережно і розглядайте це як серйозний ризик, а не незначну розбіжність. Шукайте тенденції вище або нижче нуля, що впливають на базовий сніговий покрив, особливо в секторі з високим рівнем впливу, включаючи екстремальний рельєф. Враховуйте вітер, тип опадів та зміну температури на висотних поясах; враховуйте елементи снігового покриву, такі як формування плит та кірки. Розпізнавайте ситуації, які можуть призвести до лавин, та плануйте відповідно. Звертайте увагу на фактори, що стосуються таких умов, як накопичення вітру та згуртованість снігу. Покладайтеся на повну картину, а не на одну модель, і використовуйте офіційні бюлетені для обґрунтування вашої інтерпретації. Цей підхід до прогнозування є правильним для прийняття рішень; почніть зі спокійної оцінки, а потім адаптуйте свій план у міру надходження нової інформації. Це спосіб мислення, щоб залишатися в безпеці, як для новачків, так і для місцевих жителів.
Бюлетені є основним джерелом попереджень. Перевіряйте лавинні бюлетені з регіональних центрів (та попередження про погоду з національних служб). Читайте рівні небезпеки та їх часові рамки; також спостерігайте за ознаками, повідомленими ЗМІ, але надавайте пріоритет офіційним бюлетеням. Будьте уважні до екстремальних умов і коригуйте свій план, щоб небезпека залишалася в межах керованого. Ознаки в прогнозі, в поєднанні з польовими ознаками, допомагають вам вирішити, чи відкладати, чи скорочувати місію. Пам'ятайте, що навіть з кількома джерелами, залишайтеся обережними, якщо сигнали швидко змінюються; інакше ви можете перейти до легших операцій. Якщо такі елементи рельєфу, як карнизи або ліфтові коридори, здаються нестабільними, розглядайте це як попередження та коригуйте вибір маршруту. Звичайно, цей підхід робить усіх безпечнішими.
Програми спостережень надають справжній потік даних, що доповнює моделі; обирайте програми, що отримують дані з мереж метеостанцій, веб-камер та звітів громадян. Шукайте швидкість вітру на висоті та біля поверхні, інтенсивність снігопаду та оновлення радарного типу. Використовуйте їх у своєму плануванні: перевіряйте, чи присутні накопичення вітру та ознаки нестабільності у лісах або на відкритих схилах; спостерігайте за кірками та змінами щільності; використовуйте їх для коригування плану під час руху по маршруту. Також досліджуйте базовий шар снігу та рівні утеплення на відкритих ділянках, щоб переконатися, що ви залишаєтеся в теплі та безпеці; беріть відповідне утеплення, їжу та легкий шар для підтримки довгого переходу; тримайте сигнали, що вам може знадобитися скоротити план. Ефективне управління ризиками на кожному етапі подорожі можливе за допомогою кількох надійних додатків та польових спостережень; такий потік даних допомагає вам залишатися готовим тут і зараз. Якщо потрібен перетин річки, плануйте безпечний пором, а не ризиковане брід.
Перевіряйте консенсус по моделях на найближчі 24–48 годин, оцінюйте напрямок та швидкість вітру на висоті, на якій ви будете працювати, і відзначайте падіння тиску та зміни струменевих течій, які можуть спричинити швидкі зміни. Переглядайте офіційні бюлетені щодо рівнів небезпеки сходження лавин та їх часових рамок; підтверджуйте, чи попередження передбачають відкладення. Встановіть запас безпеки: у разі сумнівів, схиляйтеся до консервативних рішень. Розгляньте умови м'якого та твердого снігу, потенціал швидкого потепління та те, як ці фактори взаємодіють із вашим запланованим підходом — мета полягає в тому, щоб залишатися вище порогу, де дані свідчать про прийнятний ризик. Цей дисциплінований процес забезпечує міцну основу для рішень, підкріплену потоком даних з кількох джерел.
Використовуйте додатки для спостережень, щоб підтвердити сигнали на маршруті: порівнюйте дані з кількох джерел, включаючи вітер біля поверхні, опади та глибину снігового покриву. Відстежуйте ознаки нестабільності, такі як тріщини, ознаки накопичення та недавні ковзання, і спостерігайте за накопиченням вітру в лісах та на відкритих елементах. Якщо ви досягаєте ділянки, де умови здаються важкими, або світло тьмяніє, відкладіть мету та переоцініть. Принесіть у поле кілька надійних джерел і записуйте час та місцезнаходження, щоб сформувати місцеву картину. При належному плануванні та дисциплінованому підході спокійна база залишається найбезпечнішим варіантом за замовчуванням; цей підхід також залишає місце для швидкого порома або повернення, якщо це необхідно, гарантуючи, що ви зберігаєте команду в безпеці та ефективній. Загальний результат — добре підтримане рішення, яке підходить кожному члену команди, навіть коли умови досягають екстремальних рівнів.
Почніть з Плану А: зафіксуйте 60-хвилинний знімок погоди, встановіть денне вікно та визначте запасний маршрут для досягнення точки виходу. Примітка: чіткий план зменшує ризик для всіх та узгоджує дії для досягнення безпечніших результатів.
Візьміть з собою супутниковий комунікатор та попередньо завантажте свій маршрут; тестування перед відправленням усуває здогадки щодо реагування на надзвичайні ситуації та максимізує безпеку команди.
У фіордоподібному рельєфі якість сигналу варіюється; плануйте перевірки на височинах, де ви можете бути вище річкових долин і підтримувати чисту пряму видимість. Стандартний ритм — кожні дві години, але коригуйте відповідно до умов; якщо погіршується видимість або зростає ризик лавин, скоротіть цикл.
Основний пристрій повинен підтримувати SMS, голос та SOS-повідомлення. З'єднайте його з додатковим джерелом живлення; в зимові місяці холод швидко розряджає батареї, тому тримайте запасні елементи в теплому кишені. Використовуйте широку сітку карти, щоб ділитися місцезнаходженням та запланованими маршрутами з командою; вкажіть очікуваний часовий інтервал та точки виходу. Рекомендується перевірений вторинний пристрій (радіо) для секторів зі слабкими даними. Згадані резервні копії залишаються критично важливими в зонах зі стійким слабким сигналом. Після кожного дня проводьте технічне обслуговування всіх пристроїв та кабелів; беріть з собою компактний комплект для виживання для укриття, тепла та базового ремонту. Найкращий комплект включає односторінковий план для кожного члена та основного контакту, який залишається доступним у регіонах Вермонту та за їх межами.
| Предмет | Мета | Живлення/Статус | Примітки |
|---|---|---|---|
| Супутниковий месенджер | Обмін місцезнаходженням та SOS | Перезаряджається; мати запасний | Тестувати перед виїздом |
| Двостороння радіостанція | Голосовий зв'язок там, де дані слабкі | Акумулятор або ААА | Канал 1; залишати сканування активним |
| Запасні батареї | Електроживлення для холодної погоди | Li-ion або лужні | Зберігати в теплому кишені |
| PLB/EPIRB | Рятувальний маяк | Регулярно перевіряти батарею | Зареєструвати в органах влади |
| Термоковдра | Збереження тепла | Компактний | Допомога в укритті, якщо зупинилися на ніч |
Встановіть первинні та вторинні ролі; призначте керівника групи та постійного спостерігача за погодою. Команда повинна залишатися узгодженою та здатною до швидкого реагування; призначте основного контактного, який може координувати з зовнішніми рятувальниками. Щодня переглядайте прогнози та лавинні рекомендації та перетворюйте їх на чіткий польовий план. Використовуйте постійний журнал стану снігу та нотатки про небезпеки; план повинен дозволяти групі залишатися в межах визначеної сітки та подалі від відкритих маршрутів над дорогами та на широких крутих схилах. Після кожного етапу записуйте час та місцезнаходження; якщо умови погіршуються, повертайтеся до консервативного маршруту та тримайтеся в межах відомих безпечних коридорів. Необхідно дотримуватися рекомендацій регіону Вермонту та місцевих вимог до обслуговування; обслуговування спорядження та дотримання найкращих практик збільшує шанси на гарантоване безпечне повернення навіть після кількох місяців зимової погоди. Плануйте іноді відступати до останніх дорожніх доступів і чекати безпечнішого вікна; це головний спосіб уникнути потрапляння в пастку та зберегти винятковий запас безпеки протягом тривалого зимового сезону.