フィヨルド沿いの拠点をボートで目指し、スキーシール歩行で1日12~18kmを目標に最初の行程を計画しましょう。暖かいボートのキャビンで休憩し、潮が引くにつれて標高の高い雪に進みましょう。このアプローチは、長い登りのために体をフレッシュに保ち、真夜中の光がルートを導いてくれるため、夜明けが手の届くところに感じられます。出発前に簡単な安全点検をすることで、旅行がスムーズに進みます。
海からアクセスしやすく、安定した雪がある目的地をいくつかスケッチしましょう。特に、リンゲン、ロフォーテン、スンムøreのルートは、海崖、長い登り、柔らかいコーン雪を提供します。海外からの旅行者は、最初の行程で地元のガイドと一緒に潮の満ち引きの時間や救助信号を学び、その後、自分のクルーでもう一度試すと良いでしょう。少人数のスキーツーリング愛好家のグループに参加して、ギアを共有し、リスクを分散しましょう。
地図とコンパスを使ったナビゲーション、迅速な雪崩テスト、さまざまな雪上での効率的なキックターンなど、スキルを段階的に向上させましょう。数値を追跡します:日照時間、風速、雪崩危険指数。状況が悪化する場合は、1日の走行距離を4~8 km調整します。60~90分ごとに休憩を取り、コンパクトなコンロとティーバッグをパックに入れて、手早く暖を取りましょう。
次のピークを夢見ていますか?海図や信頼できるフォーラムでリアルタイムのルート情報をスキャンして、インスピレーションの源にしましょう。各拠点に防水バッグに入った緊急用具を保管しておけば、安心して眠ることができ、状況が変わった真夜中にパックの中を探し回る必要もありません。次のピークを夢見ることで、集中力を維持できます。明確な休息日を設けた綿密な計画は、最終的なプッシュに向けて鋭気を養い、自信を持って目標を達成できるようにします。
ミールクダーレンで地元のガイドによる1日ツアーを予約して、安全なスキーシール歩行技術を習得し、地形を読みましょう。コーチングによって上達が早まり、リスクも軽減されるからです。
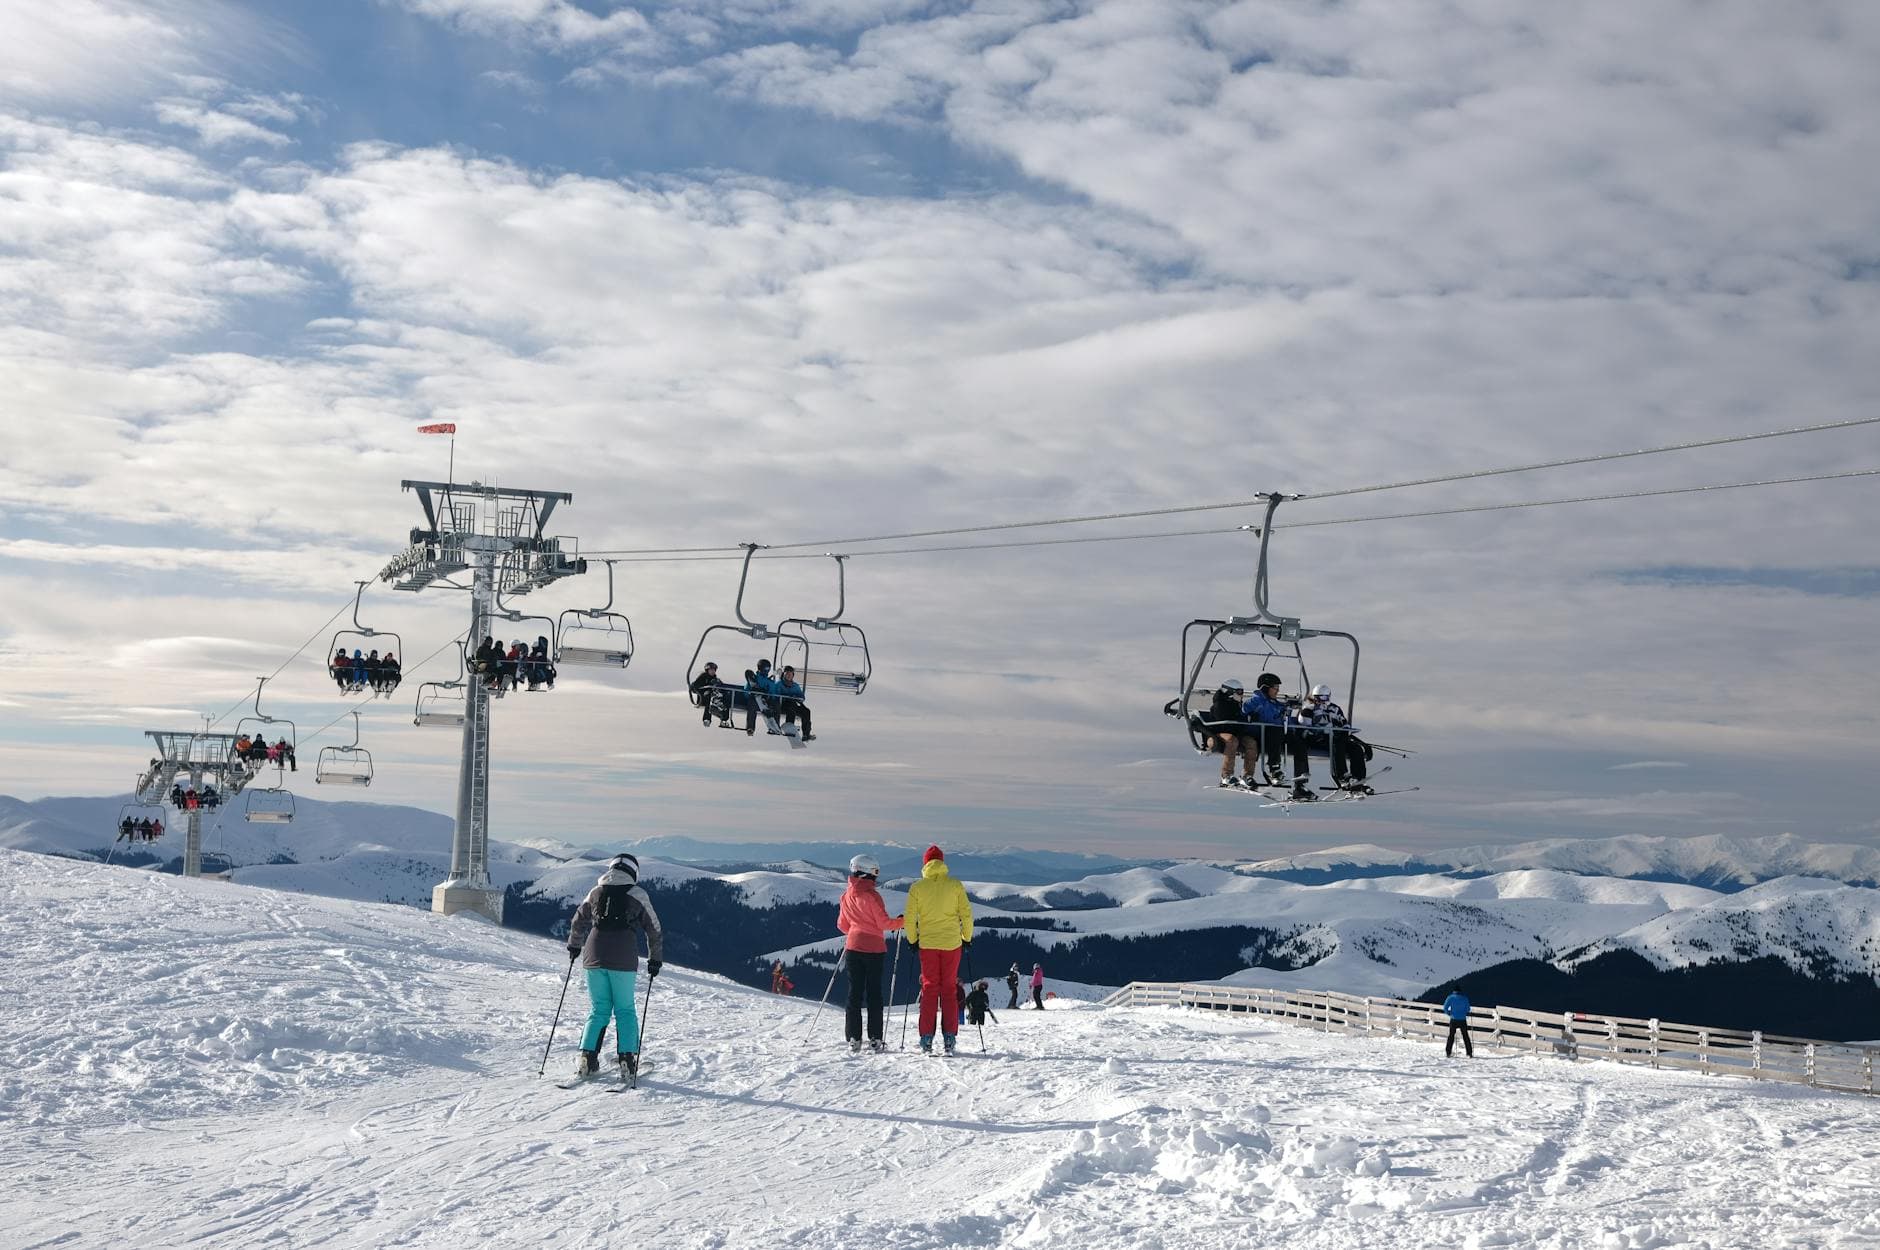
2月には、日照時間が長くなり、沿岸部の雪は午前中までよく保たれるため、鋭いラインに入る前に、緩やかな丘でスムーズなスキーシール歩行を楽しむことができます。南向きの谷間では日差しが強くなる時間帯を考慮し、ベルゲン近郊では風や短いホワイトアウトに備えましょう。
ロフォーテンの背景には、海氷と険しい山々が広がり、あらゆるスキーヤーにとってドラマチックな選択肢を提供しています。また、シェルター付きのコルに沿って簡単な登りを繋ぐこともできます。初心者の方は、フィヨルド近くの穏やかな丘にとどまり、体力がつくにつれてクーロワール面を徐々に試しましょう。誰もが短いラインと安定したペースから恩恵を受けられます。
ギアは重要です:雪崩ビーコン、シャベル、プローブ、予備のレイヤー、小型の修理キットを持参しましょう。軽いパックでスキーシール歩行の練習をし、天気予報を確認し、自分のコントロールできる範囲内でルートを維持しましょう。完璧な状態を待つのは避けましょう。状況が悪化したら、より緩やかな斜面に切り替えましょう。キックターンや効率的なトランジションなどの基本に集中しましょう。IFMGA/IVBVを使ってフィールドログを記録し、何がうまくいき、何がうまくいかないかを追跡しましょう。
ミールクダーレンは、町に近いなだらかな奥地に簡単にアクセスでき、手早く自信をつけることができる周回コースが整備されています。ミールクダーレン渓谷では、地元の人々が練習と着実な進歩のために簡単なルートをマップしています。ベルゲン周辺の旅行は日帰りで行ける範囲にとどまり、より長い冒険はボードーへのフライトと短いドライブの後、ロフォーテンに向かうことができます。アルパインに挑戦したい場合は、コーン雪の管理、安全な登り技術、稜線までの効率的なスキーシール歩行に重点を置いたガイド付きツアーを探しましょう。
最後に、グループに合わせて計画を立てましょう:誰もが何か挑戦できることがあるようにしますが、スキルレベルに合わせて露出を調整します。このスポーツを始めたばかりの場合は、短くて雪に覆われたルートから始めて、2月のセッションを数回繰り返しながら、徐々にレベルアップしましょう。適切なペースで進めば、丘の上での生活は自然に感じられ、次のクーロワールやコーン雪に満ちた滑降に備えられる、より有能なスキーヤーになれます。
まずは海岸沿いの日帰り旅行から始めて自信をつけましょう。3回の旅行を成功させ、信頼できる物資、確固たる計画、明確な回復期間を設定したら、宿泊遠征に移行しましょう。この進歩によって、より強く、安全な海岸から山頂までの道を進むゲストが多いことがわかりました。
日帰り旅行は、スンムøreの海岸沿いのセイル・アンド・スキーパターンに焦点を当てています。港からの短い移動、シェルター付きの丘のスキーシール歩行、稜線越え、日が暮れる前に海に降り立ちます。シーズン終盤には、目に見える草原とコーン雪があるルートを選び、風や視界が悪化した場合はその場所を離れることができるように、迅速な切り返しを心がけましょう。天気を確認するための携帯電話とコンパクトな安全キットを携行し、自分の限界内に収まるように登りながら調整しましょう。
宿泊遠征は、より標高が高く、深い地形を求める人に適しています。2~4日間の週を計画し、小屋の近くまたは奥地のキャンプに拠点を置き、燃料と食料を事前に配置しておくと、重い荷物を置いて、登りで軽く移動できます。スキーシールとスキーを使って、安全な脱出ルートで2つ以上のゾーンを繋ぎましょう。ノルウェー人ガイドと一緒に仕事をすれば、地元の天気と地形情報を提供し、いつプッシュまたは一時停止するかを判断するのに役立ち、あなたのパーティーを救助計画と連絡を取り続けることができます。スンムøreまたはヨートゥンヘイメンの回廊では、2回の重要な登りと週の半ばの休息日がある3泊の旅程が一般的です。
意思決定の枠組み:積雪の安定性、風、日照時間を評価します。初心者の方は、海岸近くの歩きやすいルートを選び、シェルターへのアクセスが容易な範囲にとどめましょう。経験豊富なグループは、慎重なルートファインディングを必要とする奥地のルートに拡大し、しっかりとした予備の計画を持ち、状況が悪化した場合はすぐに撤退できるように備えましょう。この地域では、ヨートゥンヘイメンとスンムøreは異なる規模とリズムを提供します。ノルウェー人ガイドは、ルートのオプション、安全に関する説明、日帰り旅行から一晩旅行への移行を可能にするためのロジスティックサポートを提供し、スキルを磨きます。
安定した予報と乾燥した期間が4日間続く時期を狙いましょう。晴天、弱い風、安定した表層雪[安全な]森林限界を超える旅行の条件が揃った午前中を目指しましょう。沿岸部では、海洋性気候のパターンを予測しましょう:嵐は海から押し寄せ、その後蛋白質の多い冷たい夜が地表を固めます。最新の予報の後に晴れて穏やかな日が訪れるような状況を探し、ピークのルートでオープンなラインが確保できるようにしましょう。
ノルティンドノの状況が支配的な場所では、水分を多く含んだ雪と突風によって状況が急速に変化します。毎日の予報を確認し、出発前に地元の専門家に現場の状況を確認してもらいましょう。マットやその他のガイドは、素早く適応するのに役立つヒントを提供してくれます。彼らの洞察を活用して、海岸を横断し、高いボウルに向かう旅の勢いを失うことなく計画を調整しましょう。
新鮮な降雪が落ち着き、穏やかな夜が氷点下の地表を固めた後、オープンな地形を利用できるようになります。地表は、斜面と向きによって滑りやすくなることもあれば、挑戦的なものになることもあります。専門家による予報の説明では、最も安全なアプローチは、4日間の安定した天候と、固く凍っていない地表という条件が揃った場所にあることが示されており、ボウルや広大な稜線に最適です。
水分量、風向、日照は、日々の計画を左右します。沿岸部のポケットでは、予報によって、風下側の斜面に風化したものができる波によって引き起こされる突風が追跡されます。標高の高い盆地では、軽い北西の風によって、表面を乗りやすく保ちながら、オープンなボウルの深さを維持することがよくあります。真夜中に突風が襲った場合は、ルートを再評価し、リスクを回避して夢のターンを維持できるように、短い休憩を検討しましょう。
予報とタイミング:4日間の予測を確認し、毎朝の最新情報を確認します。弱い風、安定した気圧、激しい降水がない期間を優先します。入り江やフィヨルドは前線の通過を隠蔽する可能性があるため、複数の情報源を比較し、専門家の意見を聞きましょう。4日間連続で安定した状態が続く場合は、光が最も良く、雪がオープンで扱いやすいときに、ピークアシストプッシュを計画しましょう。
積雪と状態:標高と向きによって変化する奥行きを予測しましょう。北向きのボウルはより長くパウダーを保持する傾向があり、南向きの斜面は日光に当たると凍ります。寒い夜の後は、固い地表とより良い滑りが期待できます。暖かい時期のあとは、注意深いルート選択が必要な柔らかい風化したものができると見ておきましょう。
地形の準備:オープンな地形は大きなチャンスを提供しますが、雪崩チェックと斜面の角度テストを怠らないでください。マットや地元のガイドからの判断されたメモを使って、積雪が安定している安全なラインを特定しましょう。
日照時間とペース配分:日照時間が限られているため、効率的な午前と夜間のバックアップオプションが必要です。夜明けと同時に出発し、長い午前中を乗り切り、最もリスクの高い時間帯の前に終了しましょう。真夜中の気温は急激に低下するため、エネルギーを安定させ、疲労を避けるために、これらの時間を中心に休憩と水分補給を計画しましょう。
野生生物と環境:キツネが小屋やトレイルヘッド付近をうろついている可能性があります。動物の足跡に注意し、野生生物の回廊を尊重しましょう。跡を残さないようにし、可能な限り確立されたルートを使用して、広大でオープンな環境への影響を軽減しましょう。
実用的な計画:予報が変化した場合に備えて、バックアップ計画を用意しましょう。近くの低い角度のラインまたは避難できる谷は、高リスクゾーンにさらされることなく、おいしいターンを提供できます。この柔軟性を利用して、より安全な日々を過ごし、ツアーでの一貫した進歩を遂げましょう。
要約すると、信頼できる予測に基づいてツアーのタイミングを計り、オープンなルートを提供する4日間のブロックを目指し、ボウルやピーク面全体の積雪の状況を監視します。天候が安定している場所を追跡することで、不確実性を排除し、北欧の計画を地球に優しいアプローチに合致させることができます。良いラインと可能なエンディングを夢見て、すべての更新情報